One thing I've always wanted to do was run network cable in my home. When my wife and I finally bought our first house, I was finally given the opportunity! My vision is to run network cable throughout the entire house including the home office and bedrooms. In it's current state, I only have runs going into the home office, but when the need for physical connections is required, I will start pulling more runs through. Here's some of pictures of my project.
Equipment
In order to perform this project, I needed some equipment. Below is a list of items that I used in order to accomplish my task:
- Network Cable (Cat5, Cat5e or Cat6, whatever you prefer)
- Crimper
- Push/Pull rods
- RJ-45 and Keystone Jack
- Cat5e wall plate
- Patch Panel
- Network Switch
- Network Cable Tester
 |
| A few parts needed when networking a home |
Once I had all the equipment I needed, I first had to design what my setup would be. My simple illustration is below
 |
| Cat5e from modem to router (1st floor to basement) - 1st floor |
I first found the DMARC coax cable that comes into the house. I then created my first run from the modem to the router that I have in the basement.
As shown above, I had to drill a hole that went down into the basement. Directly below the first floor is where I receive the cable.
I then utilized my unfinished ceilings in the basement to run the cables to the area in the basement that I kept my router.
 |
| It gets real messy when doing this |
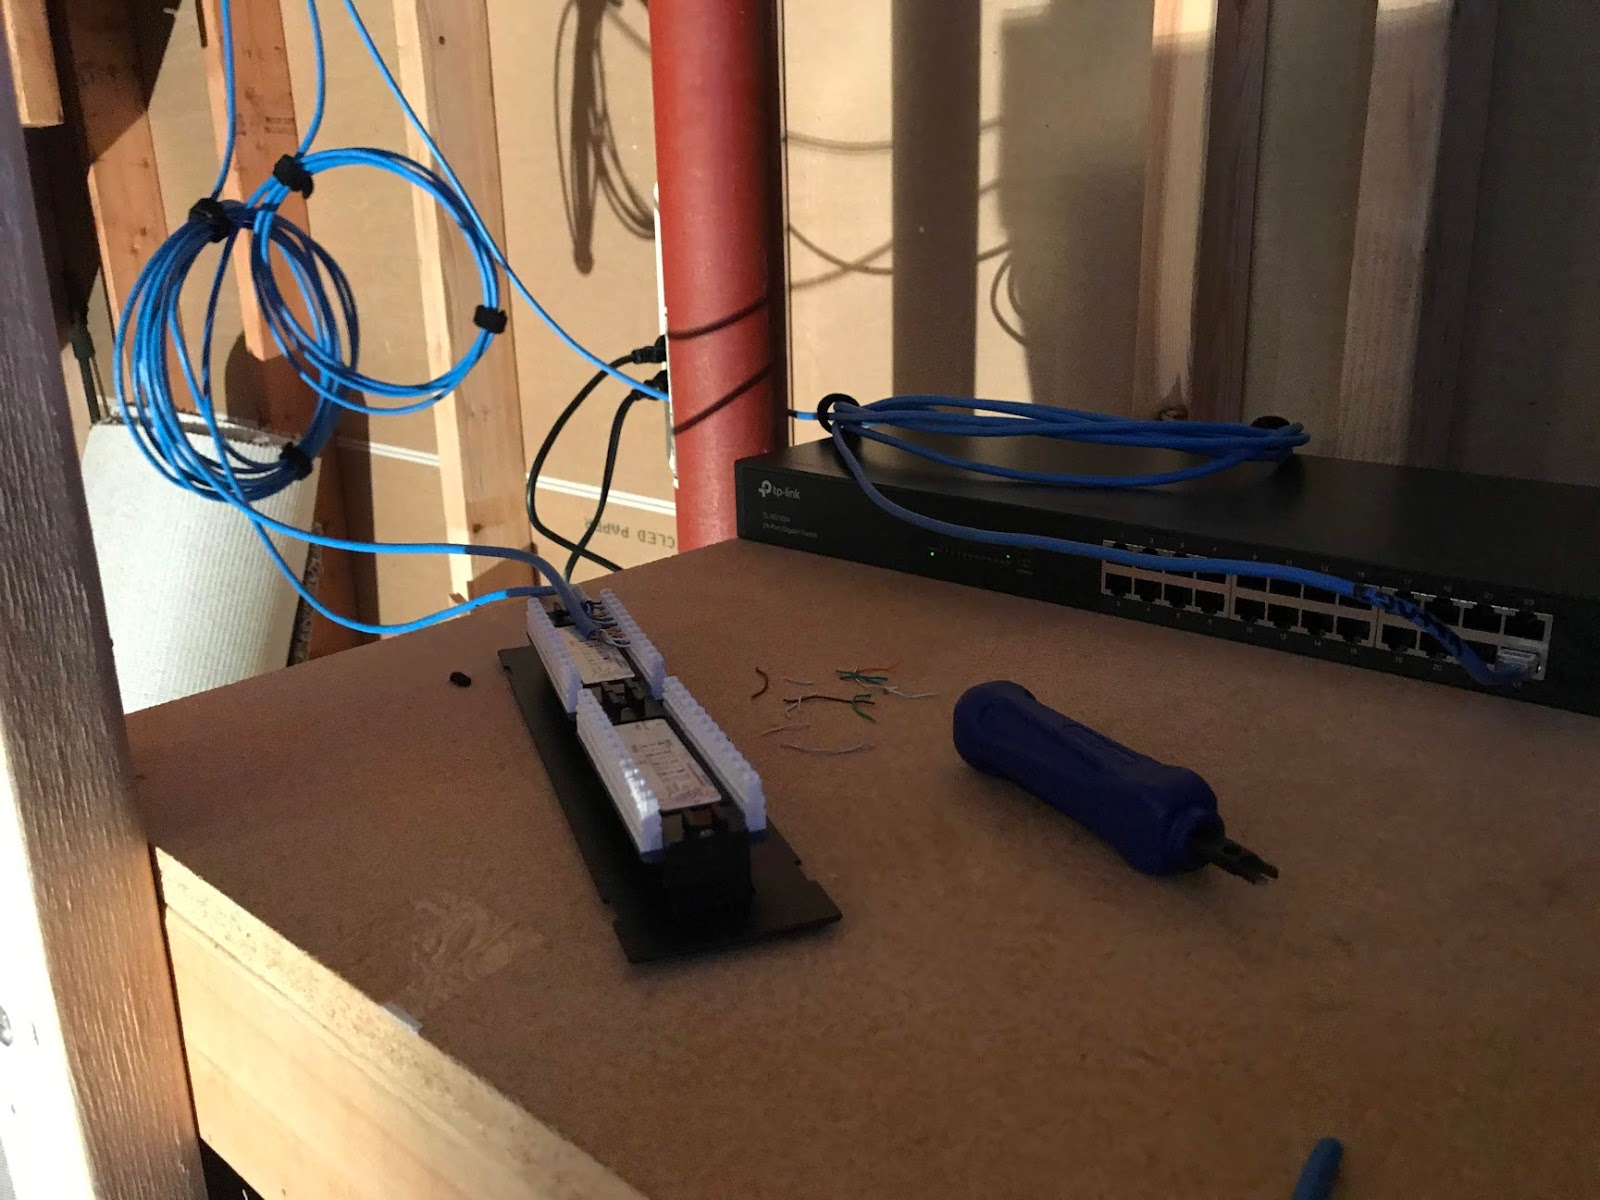
Once I routed my cabling to the finished location where my patch panel and network switch was, I connected the network cable to the patch panel.
 |
| Cable patched into patch panel |
After punching down the cables into the patch panel, I then started making the necessary amount of patch cables. Essentially, a patch cable is just a shorter cable that runs from the patch panel to the network switch.
 |
| Making patch cables |
After making the patch cables and hooking it to the network switch, I made verified connectivity was working before proceeding.
At this stage here is what I have done so far:
- Physically ran one network cable from router, through the basement and into the network closet
- Patched said cable into patch panel
- Made patch cable and connected patch panel to network switch
- Now my network switch has Internet
- Plugged laptop into network switch to confirm Internet connectivity
Now that I have Internet connectivity on the network switch, it was time to begin running cables from the home office to the network closet and connectivity it to the network switch.
I began by mapping out where in the home office I wanted my wall plate to be and where it would run down into the network closet.
 |
| This looks like a good place to put a network jack |
With the location found, I started cutting a slot in the wall to put the wall plate. Additionally, I drilled a hole in the basement that would line up with the wall plate in the office. I then took my push/pull rod and pushed the rod from the basement upwards to the office. I found the rod through the hole in the office wall plate and pulled it straight through.
 |
| Push/Pull rod now connects basement to home office |
Now that I have the push/pull rod connecting the basement and the home office, I attached the network cable to the rod and then fished the cable downward into the basement.
 |
| Connecting network cable to fishing rod |
Below is a picture of the fishing wire being pulled down into the basement.
 |
| Network cable now connecting office to basement |
With the network cable now connecting the office and the basement, I then routed the cable overhead in the network closet and patched it into the patch panel.
The next step was to close off the wall plate in the office. The first thing I needed to do was connect the office network cable to a RJ45 keystone jack. Once done, I just connect it to the wallplate and connect it to the wall.
 |
| Network Cable to keystone jack |
Above is the network cable to the keystone. Below is it being punched down.
 |
| Network cable punched down into keystone |
Okay, now that the network cable has been punched down into the keystone jack, I then attached it to the wallplate and screwed it into the wall.
 |
| Keystone jack connected to wallplate |
 |
| Wallplate done |
As shown above, the wallplate is done. However, since this was my first time, my measurements and alignment were off. Luckily since this is hidden behind my desk, it doesn't bother me. However, in the future, I'll line up my measurements better so that it is lined up with the wall outlet.
I repeated this step for the other side of the office so that my wife can plug her computer into the wall as well. I did the same steps with attaching the wall plate, fishing cable to the basement and patching it into the patch panel. I then ran patch cables from the patch panel to the network switch.
Okay, to summarize what we've done so far:
- In addition to the above, we have now connected the office to the network closet
- 2 wall plates have been ran into the basement/network closet
- All 4 network runs have been patched into the patch panel
- 4 additional patch cables have been connected into the network switch
- Confirmed network connectivity to all 4 wall jacks
Now that we have confirmed network connectivity, the next step was to clean this up a bit and mount the switch and patch panel to the wall.
I went to the hardware store and picked up a few stud bolts and I think a 3/4 or 1" plywood. I used a drill bit to make the holes and mounted the plywood. After mounting the plywood tot he studs, I attached the patch panel and the network switch. This is the end result:
 |
| Patch Panel and Switch mounted |
And there we have it. Some next steps that I am wanting to do is:
- Put a firewall/ids/ips in line (complete)
- Run more cables to 2nd floor
I hope this has been beneficial at least for a simple understanding of what is involved when networking a house. It's a lot more difficult to network a house after it has been built rather than before, since walls have already been finished and insulation added. If you have the opportunity to build a house and you are wanting to have it networked, now is the time to do so.
Anyway, until next time!